Wednesday, 28 November 2012

Winter Special: Lauki ka halwa.

During my childhood whenever I used to throw some tantrum ... that I do not want this, this is not tasty, I like that only means that only. Then to cool my temper my Papa used to prepare something special for me to make me happy and to bring me on talking terms, so that i can understand why I can not have this or that.

This weekend during weekly grocery and vegetable shopping, hubby dear bought 3 small Bottle gourds, Seeing three lauki in my fridge I was thinking what all I can prepare apart from normal Lauki ki sabzi.

Following options came to mind.
1. Lauki ka raita
2. Lauki ki sabzi
3. Lauki ke kofte.
4. Lauki ka halwa and it hitted the nail in mind.

Now recipe was not clear like how to prepare. Who else can come for a girl's rescue who is still kid at heart and will always be a kid for her parents. So I called my Papa and asked without waiting for him to say hello, "Papa ji ghiya ka halwa kaise banate hai ?" and the bestest Papa in the world shared this recipe with me.


Ingredients:

Serves 4
Preparation time:20 mins
Cooking time: 30 mins

2 cups grated Lauki/bottle gourd
2 cup milk
3 tsp milk powder
1/3 cup sugar
1 tsp Elaichi powder
1 cup water
Chopped Badam, Kaju (cashew), kismish (raisins) for garnish., chironji


Recipe:

1. Take a deep pan and boil grated lauki. When it gets boiled drain all the water and you will get soft Lauki.
2. In another deep pan, add milk, elaichi powder and cook for 10-15 mins on medium low heat, keep on stirring.
3. Add boiled lauki, milk powder, sugar and let it cook for another 20 mins, until milk starts getting thick like khoya, keep on  stirring continuously, otherwise it will stick to the pan.
4. Add chopped raisins, cashew, badam , Chironji to garnish.
5. Serve hot with a BIG SMILE :) as my dad do to cheer me up!

TIP: 1. Drain water properly from boiled Lauki, otherwise the moment you add milk to this it will become curd.
2. You can use this drained water for preparing Dal, Sabzi or in soup if you like.
3. Chironji enhances the flavor of this halwa.


 So, what are your childhood memories? Is there any vegetable which is generally not interesting but your mom and dad know how to make it interesting for you!


Wednesday, 21 November 2012

Chat Pat Paneer,

When ever guests are on their way to reach your home for dinner and you are running late from office due to last minute panic meetings and traffic on roads after 6.00 pm. 

To save your time and strength,  here is a very simple and quick paneer recipe from my MIL's kitchen to make your dinner menu tasty, bright and colorfulness.

Ok, no more delays as we are already late and guests are going to take that elevator.  ( I wish every one becomes ECO FRIENDLY and start using staircase,  here is another wish from first one , I wish we do not live in these high rise buildings so that we do not need to climb 10-11 floors :(  )


Ingredients: 

Serves : 3

250 Grams cubed Paneer
2 Nicely chopped local Tomatoes     
2 tsp refined oil ( I used Desi ghee as it increases the flavor)
1/2 tsp crushed black pepper powder ( you can use red chilli powder)
1/2 tsp turmeric powder
1/2 Garam masala  
2 tsp nicely chopped Coriander leaves.
Salt as per taste

Method:

1. Heat oil in a pan . Add turmeric powder , garam masala and cook for 1 minute.
2. Add chopped tomatoes and let it cook. for another 4 minutes or until tomatoes 
    become tender soft and turn into thick gravy paste.
3. Add Paneer, salt and black pepper. Cook for another 3-4 minutes, until paneer is
    soft and mixed well with tomato gravy.
4. Garnish with coriander and serve hot with chapati or Parantha.


Tips:

1. In case paneer was in fridge waiting for it's turn :) ,  let it come to normal room temp or warm it in    microwave for 30 seconds to get soft tender paneer.
2. Add 1/2 tsp fresh milk creme or 2 tsp milk to enhance the flavor and to get light yellow color as we get in restaurant.

Let me know if this helps you. :)

Do Share your tips and paneer recipe.

Happy Cooking and keep on smiling, as a smile can make your dinner more tasty:) Try it!


Wednesday, 14 November 2012

Rasmalai and Bengali Rasogulla


Diwali is the festival every one waits for, there so many reasons behind this wait, weather change holidays in school & office, time to meet cousins and relatives, time to spend extra time with kids, time to do some shopping for home and for yourself, house cleaning, starting new ventures..list for good things is never ending :)

Every time during Diwali I use to think when I will be able to make homemade sweets on my own. So finally during this Diwali I was able to prepare three sweets on my own. Offcourse I had done trials before to avoid any flop show on this day :)

I don't like drinking milk much from my childhood, I don't know from where I heard that milk stinks and has cream in it :(. So, I stopped drinking it unless my mom and sisters use to mix some Roohafza in it or some other flavours to make it interesting for me. Now my MIL is taking extra pain to make sure I am drinking milk :)

Rasmalai is one of the interesting ways of consuming milk for me, as they say you should consume milk in some form

I googled internet and BOOM I found this interesting and easy recipe on Manjula's Kitchen, 

Here is step by step guide from my trial and re trails :)


Ingredients for Rasmalai patties :

It will prepare 20 rasmalai's

2 liter milk
3 tsp lemon juice
1 1/2 cups sugar
3 1/2 cups water
Pressure cooker

Ingredients for Milk mixture:
1 liter milk
1 1/2 tablespoons of sugar (adjust to your taste)
1/8 tsp crush cardamom
1 tsp sliced almonds and cashew
few saffron strands.

Method:

First you need to prepare Paneer.

1. Boil the milk in a pan and as it comes to a boil, add the lemon juice and stir the
    milk slowly. The curd will start separating from the milk and then turn of the gas.
    
 2. Drain the whey using a strainer and you will get milk fat or paneer.

3. Rinse this milk fat under cold running water for 2-3 minutes to remove lemon
    from paneer.

4. Squeeze excess water from the paneer, by wrapping it in a muslin cloth and 
    then pressing hard to remove excess water.
NOTE:  Removing correct amount of water from the paneer is the important part.

5. To check, whether the paneer is ready, you should be able to make ball from 
    the paneer.

6. Knead paneer for 4-5 minutes until you are able to make soft dough.


For making Rasmalai:-

1. Divide the paneer dough in 20 equal parts and make smooth balls.

2. To make the balls apply some pressure first and then release.

3. Mix sugar and water in Pressure cooker and bring it to a boil.

4. Add the paneer balls and close pressure cooker. Once pressure builds, turn 
    heat to low and cook for next 7-8 minutes.

5. Turn off the heat and wait for few minutes before opening the pressure cooker.

6. You will see that paneer balls are now in double the size. I like this part a lot:)


7. Now take out paneer balls from the syrup and squeez lightly to remove excess 
    syrup and keep it aside to cool down.

Note: These cool down Paneer patties and sugar syrup is Bengali Rasogulla :) 
      Ek tir se do shikar :)


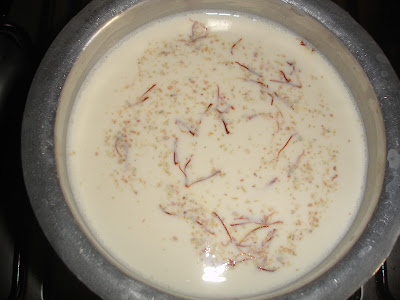
8. Now in another deep pan add milk, sugar, saffron and keep on stirring until 
   you get desired thick consistency. Keep on stirring as milk burns fast and 
   sticks to the bottom of the pan.

9. Add cardamom,saffron and Rasmalai patties in the milk and let it cook for
    some time.


10. Garnish it with almonds and cashew .

11. Let it cool for some time and serve chilled rasmalai. I added few Tulsi 
     leaves to get it extra flavor and to make it auspicious as what ever we eat 
      is prasad if it is prepared with good thoughts in heart.


I hope you like it as my family and friends enjoyed it.  So, what is 
cooking in your kitchen, this Diwali!


Happy Diwali ! Happy Cooking!


Wednesday, 3 October 2012

Poha: Healthy start of the day


This is first dish that I prepared after marriage :). I know this should not be the first dish after  marriage but still, it's an easy to cook and a very health breakfast. My, sis is a huge fan of poha and can have it during all the meals :).

I learnt this dish during my short stay in Maharashtra and since then it's sure shot recipe I seek to, when I am hungry and looking for quick snack.


Preparation Time: 10 mins.
Cooking Time: 10 mins.
Serves 4.

Ingredients
2 cups thick poha (beaten rice flakes)
1 tsp ground nuts
1/2 tsp mustard seeds ( rai )
6 to 8 curry leaves (kadi patta)
1 to 2 green chillies , slit
1/2 cup chopped onions
1/4 chopped carrots
1/4 greens peas
1/4 green beans
1/4 tsp turmeric powder (haldi)
1/2 tsp sugar (optional)
2 tsp oil
1tsp lemon juice
5-6 fried cashew
salt to taste

For garnish:
2 tbsp chopped coriander and few fried cashews.


How to cook step by step:
1. Place the poha in a sieve and wash it under running water for a few seconds. Drain out all excess water and keep aside.
2. Heat the oil in a non-stick pan and fry groundnuts for 2 mins and keep them aside.
3. In the same pan add mustard seeds and cumin seeds. When seeds crackle, add curry leaves and green chillies and stir for 1 minute.
4. Add the onions and saute till the onions turn golden brown.
5.Add carrot, peas, beans and  turmeric powder, salt.
6. Add poha, sugar, a little more salt, groundnuts and little water and mix well.
7. Cover it wid a lid and cook for next 5 mins.
8. Add lemon juice.
9. Serve hot garnished with the green coriander. I used fried cashew for garnishing as I do not had coriander at home.


Tip: 1. There are different types of poha or avlaki available in market and you need to pick the correct one to get perfect taste and texture :).

2. Sugar and lemon gives a special sweet and sour taste, you will like it.

3. You can add any vegetable your kids like to make it interesting for  them.


Sorry, picture clarity is not good, B took them using his mobile. It's difficult to  take a good pic when  family is hungry and food is delicious, as it vanishes before you take your camera out to show some light ;)


Tuesday, 25 September 2012

Love for Yellow

From long time I was looking for ballerina shoes in YELLOW. Finally my search ended during our recent trip to Singapore.

 I don't know how many shops my dear hubby has gone with me to search the PERFECT one for me . Love You B!


This lovely Money Plant was waiting for it's first picture in my sister's balcony. I like this combination a lot. what about you :)

Shop Details incase you are in Singapore and want to go shopping :)
Shop Name: Charles and Keith 
Cost : $43 ( Singapore dollar) 
Location: Singapore ( Marina Bay Sands)

I was so happy after buying them that I decided taking a pic once I reached home and was in them :). Now sending it to Sole Sister to share my shoe fetish.

What is your color? Are you also a Shoe Shopaholic :)

Wednesday, 25 July 2012

Marriage and Cooking comes hand in hand :)

I know this topic is not new for already Married people, but I still want to sing this song once again, as I got married recently .. not so recently but still 10 months are also counted as recent right? I know many gals will be nodding their heads in agreement with me :).

Ok, lets come back to the topic why I am writing this blog....

I am a new blogger, a new wife, a new daughter in law. Too many roles hmm...

But after getting married, I had to restart my cooking learning curve once again as per my new family traditions and way of cooking. Till now I was cooking for myself, who can survive on Maggie :).

So this is for my loving, caring, Die Hard A.C. (as fan is too small compliment for my Hubby) and family. Finally I decided lets start experimenting with food as I like cooking for the people I love.

So here I am to pen down my tried and tested recipes which may help you as well during your tricky cooking days,...

Happy Learning , Happy Cooking!!